Showing posts with label bench jeweler. Show all posts

Monday, September 30, 2019

09.30.19 Matchmaker, matchmaker make me a match...

Ever since I started taking classes and making jewelry - going on five years ago - I've had people ask me if I could repair or rework old pieces for them.  My answer was always no, and after repairing one pair of earrings, the answer remains, no. While I have achieved some level of mastery with silver pendants, and I am happy to make custom pieces for folks, the last thing I want to do is mess up something that is important to someone else.

Photo credit: Snooze Eatery
So, when a dear friend came to me earlier this year and asked for my thoughts on pulling diamonds and emeralds out of old pieces, and doing something new with them - I said I'd be happy to look at them with her - but then I was going to refer her to someone else to do the work.

We met for breakfast at Snooze (the food is all good - but I think my favorite is the Spuds Deluxe), got caught up on lives and kids, and started talking about what she wanted to do with all those stones.

There were some inexpensive diamond earrings she had bought for herself, some emerald earrings, and a ring with a large emerald and some fabulous baguette diamonds.  She was no longer wearing any of it - and she wanted some new pieces that she would wear!

Photo credit: De Pastel
I knew before we had finished our conversation that I was going to put her in touch with De Pastel. You'll recognize De's name from lots of posts - she was my instructor for Fabrication 201, and both kinetic jewelry classes.  She's an amazing metalsmith, and has become a great friend.

Not long after we had breakfast De was in possession of my friend's jewelry, and the process of deconstruction began in earnest.  I also got to be a virtual fly on the wall as the new designs began to take shape.
Photo credit: gift recipient


The first piece was a three stone ring, that I knew was going to be a gift for my friend's daughter's birthday.  I got a message from my friend - along with a photograph - when she delivered the finished ring.  Everyone was thrilled!

The remaining stones were set into new earrings, and two more gorgeous rings that my friend kept for herself.

It can be frustrating to have jewelry that you never wear hanging out on your dresser or languishing in a drawer - and it is so satisfying to see great stones in unworn pieces take on new life.

Photo credit: De Pastel
It's also incredibly satisfying when I can connect people in a way that is beneficial to both of them - and strengthens my bond to the jewelry community.  It has been such a joy to watch the process involving two wonderful friends.

I'm excited to get caught up with my friend later this summer - and see all her updated bling in person!

Photo credit: De Pastel


Until next time.

Sunday, September 15, 2019

09.16.19 A Few Small Repairs

Sunny came home to her favorite room
Sunny sat down in the kitchen
She opened a book and a box of tools
Sunny came home with a mission

-- Shawn Colvin

This time last year I was gearing up for the holidays - I wanted to have enough inventory for the couple of small shows I was doing and to make sure that my Etsy shop was well stocked.  This year, I am taking a somewhat different approach.


Even before we went on vacation in July, I had decided I really needed to take some time and focus on myself - and what was good for me.  So, when we got home, I made time in the studio a priority.


I hadn't really been at the bench on a consistent basis since taking the kinetics class in the spring, where I made this turquoise pendant, which has become a favorite.  I wore it all summer, with my rediscovered turquoise earrings from high school!

I really like the earrings, and started thinking about maybe making some similar ones.  I thought, how hard could it be...get some large, closed jump rings, bezel cups and small stones...I even did a little sketching.


Then I remembered I had a pair of similar moonstone drops (with the earwires cut off) that someone had given me with the suggestion that I could salvage the stones.  I decided that instead, I would see if I could repair them.

I took the earrings with me to open studio with one of Creative Side's wonderful instructors - Rita Marie Ross - and asked for her advice.  She said she thought it would be a great learning experience for me to do the repair - so I got started.

I couldn't repair the earwires until I removed the stones from their settings.  I used a dull X-ACTO knife to open up the bezels, and when the stones fell out, so did a bunch of little pieces of paper (which would probably have caught on fire).  The paper had been packed in behind the stone to lift it up in the bezel, and there was a small piece of black paper on top (to make the stone flash blue - another tip I learned from Rita).

Once the stones were out, I soldered on new earwires, cleaned up, filed and reshaped the bezels.  Even with the bezel cups filed down, the stones were a little short, so I punched out tiny silver discs to elevate the stones - but first, I darkened them with patina.  Same concept as the paper - but now the entire setting was silver.

The next step was to reset the stones...and I was reminded why I don't make things with little, bitty cabochons.

Using a tiny bezel pusher (made using a nail and the belt sander) and a sharp burnisher, I worked until I had pushed the metal down securely over the stones.

In the process I also gave myself callouses on my thumb and forefinger, and poked myself (and drew blood) on my middle and ring fingers on my left hand.  So much for my ambitions (delusions) of making more earrings with tiny bezel set stones.


I am really pleased with the repaired earrings, they look great with my moonstone pendants - including one I made several years ago in Vickie Hallmark's PMC (precious metal clay) class at Creative Side - and Rita was correct, it was a valuable experience.  However, from now on, if I want earrings with tiny bezel set cabochons, I will buy them from a fellow jeweler who enjoys that kind of work!

Until next time.


Monday, February 27, 2017

02.27.17 You go back, Jack, and do it again...

What a difference a year makes!  When I first wrote about this gray labradorite - and the pendant I made - I had really just begun designing and fabricating, and I was still working in sterling (now everything I do is in argentium).  

I wrote then that "when I saw this stone I had two thoughts...first, that I HAD TO have it; and second that it made me think of a Texas thunderstorm.  The shape is a perfect raindrop, and the color really is like the dark gray of a storm with flashes of lightning."  It still looks like that to me.


I decided to call it "Thunder and Lightning" and put a lightning bolt on the reverse.  I remember being pleased with pendant when I finished - given my skill level at the time - but since then, when I've pulled it out to wear, I looked at it and decided I wasn't happy after all. It was not because I hadn't done good work - I had, but I've learned so much since then.


With many, many more hours at the bench under my belt, I could see so many things I wanted to fix - I would just put it back in the drawer.  After doing that a few times, I decided I was going to take the stone out of the first setting and remake the pendant.

There were some things from the original concept that I definitely wanted to retain, like the lightning bolt and the twisted wire around the bezel - and other things that I wanted to improve.


The first time, the point on my bezel was crimped, I had flattened the granules in the process of sanding the piece, the list of newbie mistakes goes on...so...


I cut the bezel just enough to pop out the stone, and got busy making a new one - this time in argentium.  I kept the lightning bolt on the reverse, and the twisted wire - but I used serrated bezel wire, to echo the sharp edges in the lightning bolt, and put a small trio of granules at the bottom of the drop. 


I finished the metal work, then once again added patina.


The result was the pendant I had originally envisioned - when my ideas outpaced my ability.  It's really gratifying that a year (and many hours at the bench) later, I am able to produce the kind of work I really want to wear.

Until next time.
Monday, November 9, 2015

11.09.15 Shop local: Shaesby

Photo credit: Shaesby
I've been a fan of Shaesby Scott's beautiful diamond and gemstone jewelry since I first saw his Soleil stacking rings in Eliza Page a long time ago.  Since then I have been following the expansion of his jewelry line and the evolution of his work.

These days, I am completely smitten with his new Isla collection featuring oxidized silver, satin texturing and diamonds.  When I received an email that he would be doing a trunk show at Neiman Marcus, I put it on my calendar, thinking "attending a trunk show is work for a jewelry blogger, right?"

Photo credit: Shaesby
I'm so glad I did!  Not only did I get to see his gorgeous collection in person, but I had a chance to visit with him and his lovely and gracious staff - and the result was an opportunity to visit his  Austin jewelry studio plus a new custom piece for me!

After seeing the jewelry up close at the NM show, I realized what I really wanted was an all silver Isla pendant - with bright silver accents.  Michaele, Shaesby's sales director said "we can do that" and asked if I'd like to come by the studio to see the pendant in progress.  Would I ever!

So, I couple of weeks ago I spent a Friday morning in the studio with two of the wonderful bench jewelers - Travis and Carlos - who work with Shaesby to take these amazing pieces from concept to completion.  Not only was I impressed by their skill as jewelers, but also by the way they talk about the company and the work they do.

Both Travis and Carlos have been with Shaesby for over a decade; it's clear that they love their jobs, and you see that when you spend time watching them work.  When I arrived Travis was working on a pair of custom Isla earrings - the original pair was carved in wax, which was cast - in very much the same manner I made my first pendant - then a mold was created. Additional pieces are cast in the mold, and then each piece is finished and assembled by hand.

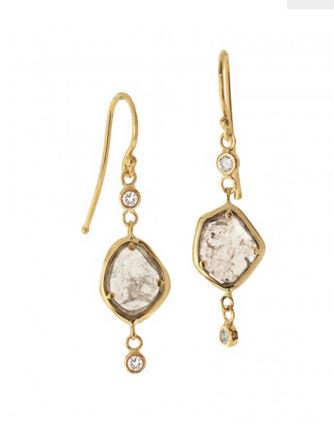
At  the next bench, Carlos was carving individual bezels for diamond slices out of wax.  After marveling at their mad wax skills,  Travis showed me his technique for bezel setting the 2mm diamonds that also go into the earrings (not any easy thing at all - I learned having set some tiny diamonds in my own pendant).  The entire process reminded me of ballet - true professionals make it look so easy - but after doing a very limited amount of bench work myself (or the case of ballet, watching my daughter for years) I knew there was nothing easy about it.  Bench jewelry is a complex art form - and you see it in the finished pieces.
Shaesbly slice earrings


When I arrived at the studio, the components of my necklace - pendant, bail and clasp - had already been cast and fabricated.  The next steps were to polish, oxidize and assemble them into a finished piece.

I watched Carlos finish the surface and edges of the pendant, preparing it for the oxidizing treatment - which transformed it from bright to dark - before setting the diamond in it. I love how the dark silver really makes the diamond pop!


Finishing the pendant involved creating and attaching the bezel, finishing the surface polishing and hanging on a lovely silver chain with a hand crafted clasp.

I'm beyond thrilled with my new necklace - and so excited to tell everyone the story behind it.  I encourage you - especially during the holidays, but any time you are looking for a special gift - to search out folks who take pride in their craft, and put their care and talent into every piece.

You can see and shop for Shaesby's pieces in Eliza Page, in the studio by appointment in Austin, or online. Tell them I sent you.

Until next time.