Showing posts with label turquoise. Show all posts

Monday, March 11, 2024

03.14.2024 March Madness

My basket set pendants

Those of you who follow my Instagram account might remember that on Monday I put up this cute photo of my pendants, with the message that internet goblins ate the blog post I had all ready to go for March, 

My CR-V post impact


and THEN later that day I posted THIS photo of my car, after getting hit on the way home from running errands and stated there would be no blog post this month.


Today, after hours on the phone dealing with insurance, I changed my mind and decided I needed to write.

Originally, I had titled the post "A tisket, A tasket" because I was writing about making basket settings, and couldn't figure out how to tie that to basketBALL. I had considered "Slam Dunk" or "Nothing But Net" but those didn't work at all

Then Monday happened, and I decided that this week has, in fact, been madness...so that's the title I'm going to use...and now I will attempt to reconstruct my story about making basket settings for pendants.

I put a fair number of progress pictures up on my IG account, but I thought you might find a narration of the process interesting...so here goes.

An early - and still favorite
bezel set turquoise
I have set a lot of stones along my jewelry making journey, but they have all been bezel set - which means a piece of sheet metal was fitted tightly around a cabochon (flat backed stone) and soldered (or fused) to a backplate (another piece of sheet metal) to create the setting for the pendant.  

Bezel and basket settings use the same materials - sheet metal and wire (they can also be carved in wax and cast in metal) - to create the framework for the pendant, but that's pretty much where the similarity ends.


Beginnings of the basket
As with bezel setting, geometry and order of operations are critical for creating basket settings - maybe even more so.

For a basket setting you do shape the metal to match the shape of the stone - but these stones are faceted on the back - so instead of fitting inside the metal, the stone sits on top of the setting.

Instead of adding pieces to make the setting - as you do with a bezel pendant - you cut metal away to open up the basket.

I started with the turquoise because it's much easier to build a setting - any setting - for a round or oval stone than for one with corners like the tourmaline.

First set of prongs


After forming the sheet metal, and making sure the stone sits properly on top of it, you begin to cut away the center portion of the metal - leaving two thin bands.  

It's important that you only cut halfway around the setting at first, otherwise you will have two completely separate wire-thin pieces and completely eliminated the advantage of fabricating the basket from sheet.


Once the basket is half open, you attach the first set of prongs - which gives your piece stability while you open the other side - and then attach the other set of prongs.

Oops
The process is essentially the same for a square or rectangular stone, but there are corners - and those are tricky.  The base has to have 90 degree angles; to achieve those you create mitered corners by filing into the sheet metal before you bend it, and then you solder the corners to reinforce the metal.

If you file too deep - or get your metal too hot - your box will fall apart and you get to make it again...all part of the learning process.

Using 3rd arms to hold the piece in place

The second attempt at the rectangular setting went better, and faster, than the first...and turned out quite well.  Same process once I had the base constructed - cut out one side, solder carefully, cut out the other side, and finally attach a bail.

When making a pendant, you do need to leave a small piece of solid metal at the top of the basket so you have a place to anchor the bail.


A word about adding the bail.  That went much better on the second pendant as well - and had nothing to do with the shape of the basket.

Ready to polish and set

For the turquoise pendant, I got everything set up and attached the bail using pick soldering (picking up the solder with a special tool and placing it where it will flow and attach pieces together).  That works great, except when it doesn't, and because my solder didn't flow on the back side of the bail, I ended up melting it off and doing it twice.

For the tourmaline, I opted to sweat (melting the solder on to the frame before placing the bail down) solder the pieces together - learning from my mistake - and it went beautifully.

None of these setbacks were particularly frustrating or problematic - they were simply opportunities to learn - which is why I signed up for classes in the first place.  I went back to the bench with a desire not so much to make more of what I had done before, but to challenge myself to make new and different things.

Cookie - keeping me company
ACC is on spring break this week - but I'm excited to go back and fabricate another basket setting, or two, before the end of the semester. One of the truly wonderful things about being a continuing education student is that I can sign up for the same class more than once - so it's my intention to take Jewelry Technique 1 again, and continue to learn from master goldsmith Steve Kriechbaum.

Watch this space - there's definitely more to come!

Until next time.


Monday, March 9, 2020

03.09.20 Tourist for a Day

This is the photo in my blog banner.  It is a collection of zircons from the Hall of Gems at the Smithsonian Museum of Natural History.

I took it in the summer of 2013 (before I ever thought seriously about taking jewelry making classes) on a family vacation to Washington DC. I grew up in the DC suburbs, our family had a membership to the Smithsonian - and went often - this became my favorite exhibit more than 40 years ago.

In front of Calder's "Obus"


We were back in DC in February - it was a weekend of wall to wall family events - except for a few hours on our first day there...so, we hopped on the Metro and headed out to be tourists!

We started at the National Gallery of Art - also a favorite - especially the contemporary art in the East Wing. Not only did I see Calder's sculptures and mobiles, but there is a new Ellsworth Kelly installation in the foyer.

Ellsworth Kelly at NGA


While my own work tends to be much less abstract - I have always loved the incredible use of vibrant color by both of these artists.  I could (and have) spend hours in the museum's light filled atrium just meditating on the objects around me.

NGA Degas Art Mug


After soaking up some culture, grabbing lunch, and this fabulous new mug (link in the photo caption if you want one too) - we headed over to the Museum of Natural History...because a Smithsonian visit is not complete without a trip through the gems.

I spent a couple of hours meandering through the halls filled with rough and finished stone specimens...but it was different from my previous experiences...this time I was looking at the gems and minerals as a jeweler. 
Cross section of Spectrolite


I could identify things by sight - without first looking at the information labels - and as I walked through, I was thinking about the various pieces I had made using the stones in the glass cases.

It sounds silly, but I was almost giddy when I realized how much more meaningful it felt to come back to this place with new knowledge.


I decided to take photos - a lot of photos - of the various stones I have used in my work, and I created an album on Facebook.  Over time, my plan is to add photos of my jewelry made with these minerals and gems in the comments under the pictures from the museum.

I loved this turquoise grouping (of course I did) - especially the piece showing the bright blue in the matrix, which I use in so many pieces.


I knew when I started taking classes at Creative Side that I would learn new things, but I continue to be surprised at how much knowledge I've acquired - about myself, the creative process, and the world around me - beyond what I expected.

Thanks as always for joining me on the journey.

Until next time.


Monday, January 28, 2019

01.28.19 It Started with a Song

Photo credit: Bloodshot Records
...well, with a songwriter, actually -  Rosie Flores and her turquoise guitar.  I bought a great ribbon turquoise - but instead of the usual tan, the matrix was gray - with the blue cutting diagonally across the stone.

My first thought was "it looks like Rosie holding her guitar"...then, I thought...it needs a cowboy boot on the back, and I'm keeping this one...


Everyone, including me, loved the boot!  So I made another pendant - with Royston turquoise - and it sold, right away! Now, it's become kind of a "thing" - and with each new piece of this variety of turquoise, I start to play around look for the best placement of the cut out to show off the stone.


More recently, I decided to make a boot pendant with a piece of wild horse magnesite - and the result was terrific.  The brown and white stone resulted in a great looking pendant (that is listed in my Etsy shop, along with another Royston boot).


In addition to my wildflower pieces, I'm really getting a kick out of creating these ironically Texas pendants.


The end of last year - Rosie Flores played at the Cherrywood Art Fair on a very cold Saturday.  She was bundled up - and so were we.  With some some hot coffee in hand, we enjoyed her band despite the frigid temperatures.  It was great to see her play her turquoise guitar...especially because I was wearing my pendant.

Follow along to find out what inspires me as I head back into the studio for 2019.

Until next time.


Monday, December 11, 2017

12.11.17 Happy Accidents (part 2)

In the same shipment as the turquoise chips, there were several pairs of drilled bars for earrings.  Unfortunately, as sometimes happens in shipping, one of the stones cracked.

I contacted my sellers, who promptly sent me a new pair of stones, but I hated the idea of not being able to do something with the broken one...


I asked a number of folks I know who work with stones if because it was a clean break, I could glue the pieces back together?

I knew I wouldn't be able to sell the earrings, but if it worked - I could keep them.


With information about the type of glue to use (clear drying two part jewelry epoxy) and some good instructions, I put the pieces back together, wrapped them with painters tape and waited to see how it turned out.

Lo, and behold - it worked!  If you hold them close and look very carefully you can still see the seam where the stone was repaired, but you have to know it's there.

There were several other pairs of stones in my order, and they made their way into my shop, but I'm still feeling pretty proud of myself for mending these...

...and I'm really enjoying wearing them.


Until next time.

PS - my time in the booth doing descriptive audio narration for the Nutcracker went really well! Here's a bonus picture of me - with my script and microphone - just before the show!

Sunday, July 23, 2017

07.24.17 Everything's bigger in Texas

I love doing custom work - there is a special sense of satisfaction and accomplishment that comes from taking an idea or request from a client, and turning into a piece of jewelry that tells their story. When a request comes from a fellow artist - well, making that kind of piece is truly an honor.

I've purchased a number of wonderful cabochons from Chip and Deborah Allen, including this beautiful Kingman turquoise. They are wonderful folks.  I've gotten to know them through the Cabs and Slabs facebook group - and it turns out that they, too, are Texans.

Not too long ago, I had a message from Chip asking if he could send me another piece of Kingman so that I could make a custom pendant for Deborah.  I said "of course" and "thank you" because his request is an enormous complement.

When the stone arrived, I was not surprised by the quality - but I was amazed at the size - and excited to get started working on the pendant.

Deborah had seen some of my other pieces with Texas cut outs on the back, so she knew that was what she wanted. Because of the size of the stone, I made the cut out almost a full square inch - so lots of the color could show through on the back.


I used the same style as the other piece of Kingman - serrated bezel surrounded by twisted wire - to set this piece, but because of it's size, it needed a substantial bail rather than just a small wire loop.

This style of setting has become something of a signature for me - I love the look that I get when I put a patina on the twisted wire and then give the whole piece a high polish.


The last step before setting the stone is making sure there are no scratches or patina in the wrong places, then I hand polish, both the pendant and a chain that has been oxided to match, with a Sunshine cloth.

I'm really pleased with the finished piece, and delighted to have had the opportunity to make something so special for people I am glad to call my friends.

The Allens are among many of the wonderful folks I have met in my metalsmithing journey - hopefully we'll meet in person on one of their trips through Texas.

Until next time.


Monday, March 6, 2017

03.06.17 The trouble with turquoise...

...is I really want to keep all of it!

It is truly one of my favorite stones - and the more I work with it, the more finished pieces I want to hang on to!

The copper rich stone was first called "turquoise" by the French in the 17th century, because it was first brought to Europe from Turkey.

Turquoise is mined all over the world, and has been used in jewelry making since ancient times. It one of three blue December birthstones.

The first piece I made in argentium, used a piece of green turquoise.  I didn't need any more stones, but there it was in the tray, and I picked it up and couldn't put it down...and so it began...

After I joined the Cabs and Slabs group on Facebook, a whole new world of possibilities opened up.  I had no idea how many varieties of turquoise existed...but I've learned a lot!  The lapidary folks are fabulous - and I'm so glad to be part of their group. I've bought some beautiful stones - and often, the seller will include a "bonus" - an irregular or smaller stone, along with the piece I have purchased.

I put one of those bonus stones to good use in my wax class - and still others have became earrings (all sold) or rings (which are also posted in the shop).


Currently, I've become very enamored of  "boulder" or "ribbon" turquoise.  When a lapidary artist gets a piece of rough that has turquoise running through the surrounding rock, they can cut it to feature the veins of blue.  I fell in love with this big heart online, and was not disappointed when it arrived. I'm really happy with the pendant, and especially pleased with the cut out on the back...and because every piece of jewelry tells a story, they all get a name...this one is "West Texas Waltz".

Even with the best organizing system possible - I don't have the room (or budget) to keep every piece I make - so like my children, I have to send them off into the world.  So watch this space, my shop and my Instagram feed - for lots more turquoise!

Until next time.

PS - I write my posts at least a couple of weeks in advance - and since writing this one, I was able to end my Nordstrom boycott - and the first thing I bought was this watch I'd been coveting...because TURQUOISE!


Monday, March 14, 2016

03.14.16 Pi Day

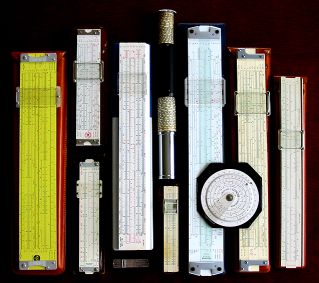
Photo credit: Slide Rule Resource Center
When I realized that March 14 was a Monday, I could barely contain my excitement as I thought..."a Pi Day post!"

Mine is a family of geeks and nerds; scientists, engineers and mathematicians; thinkers and tinkerers.  My father had a PhD in theoretical physics, my mother was a mathematician.  Early in their courtship my Dad gave my Mom a half size mahogany backed K+E slide rule.  My grandparents were perplexed by his choice, but my mother loved it!


My husband, who now builds integrated circuits, was a high school champion in academic slide rule competitions - yes - they had that in Texas.  Our oldest son is the chief mechanic for high end chain for bicycle stores - he's all about application and precision.  Our middle son graduated summa cum laude with a degree in mathematics.  Our daughter is almost halfway through college, majoring in biochemistry.

Pi Day is a holiday created for people just like us - and just a couple of weeks ago, I finished a piece of Pi jewelry.

I didn't hesitate when I saw this green turquoise cabochon - I bought it and started to think about what I wanted to do with it.  I loved the color - which reminded me of a granny smith apple - and that was the source of my inspiration...I would call the pendant "Apple Pi".

Of the work I've done so far, this may be my favorite piece.  Not just because of the stone, but it is my first piece in argentium which can be fabricated by fusing rather than soldering (I could write another geeky post about the differences between argentium and sterling...but that's not for today).

It's also my most detailed saw work. Because argentium has a different melting temperature than sterling, the assembly process is a little different.  With sterling, I can cut the backplate at any point in the assembly process - with argentium, piercing the backplate is the last step before polishing and finishing.

Photo credit: amazon.com
It's much easier to saw with the bezel up and the flat side of the backplate down, so to make sure the "Pi" was facing the right direction, I had to draw it backwards on the inside of the piece.  I'm really, really pleased with the end result - and now thinking I might make another Pi pendant to put in my shop...perhaps a circle on a square backplate, because we often joke at our house "pie are round...not Pi R Square."


No matter what your preference - apple, pecan, lemon meringue, pizza or chicken pot pie - I hope you find time today to order a slice.


Until next time.

Monday, June 15, 2015

06.15.15 So nice, I bought it twice.

Photo credit: Sundance Catalog
As I have previously confessed, I have a habit of wearing the same jewelry and clothing over and over again...my mom uniform is made up of the same Lands' End cardigans, striped shirts and LL Bean capris in pretty much every color available.  I do it with shoes - I have multiple pairs of the same shoes in different colors, and occasionally, I double up on pieces of jewelry.

One of my favorite Austin jewelry artists is Laura Gibson, who sells her jewelry on Etsy under the name Metalsgirl. I met Laura at the very first Cherrywood Art Fair, in 2003, and I think either my daughter or I have purchased something from her every year since.

Photo credit: finntastic2006 on Etsy
This past December, she had her Seven necklaces on display and I fell in love with the labradorite version.  The stones are a beautiful, opalescent grey - and I knew they would go with lots of earrings (these two pairs are just a couple of them) and outfits I already owned.

Labradorite and turquoise
versions of the Seven necklace
Sure enough, I do love the necklace, so I asked Laura about another one in turquoise.  As it happened she was in New York City when I first contacted her, and promised to find the perfect color for my necklace.  She did, and like her other pieces, I've been enjoying it since its arrival. 

Of course the beauty of handmade is that even when I order the same item from the same jeweler, they are unique - and that makes them all the more special.

This month Laura has embarked on a month long project to create a new piece of jewelry every day in June.  Not only is she creating amazing new one of a kind items - that you can buy in her nifty Etsy store - she's donating the proceeds to Blue Dog Rescue; just look for the items labeled "30 Day Challenge".  She's only halfway through - and I don't know if I can resist for the rest of June.

Until next time.


Monday, April 6, 2015

4.6.15 Home Grown

It looks like winter has finally faded away, and it is truly spring.  Sunshine, blue skies and bright green have replaced the browns and greys of the past few months.  Soon there will be local peaches, strawberries, and tomatoes. 

One of my favorite local growers, and an organization I am proud to have supported since it's start, is Urban Roots.  Urban Roots provides paid internships to high school students to work on a 3.5 acre urban sustainable farm in East Austin.  Not only do the interns sell their produce to local shoppers at farmers’ markets and through CSAs, they donate thousands of pounds to local food support organizations.


Thinking about Urban Roots made me pull out this great Kendra Scott necklace that I scored at one of their fundraisers several years ago, as part of a silent auction package.  The turquoise is very springlike - a clear blue like the sky on a summer day.

I don't own a lot of "statement" pieces, but I really like this one because while it is long, and larger than a lot of what I wear, it never feels like too much.

Kendra Scott's jewelry is home grown, too.  Back in 2002, she started her business with small trunk shows in boutiques around Austin and Texas.  Her highly recognizable jewelry is now seen and sold all over the country.

Photo credit: Kendra Scott
Her flagship store in Austin is fabulous, bright and airy and the staff is great.  They also have something they call the "color bar" where you can mix and match stones, metals and designs (you can do it online, too, but it's even better in person).  It's ideal for someone like me - frequently I know what I want (but I can't find it), so it's nice to be able to say "I like that one, but can I have it dark green and silver instead?".
Photo credit: Kendra Scott

On a trip in to the store last summer, I spotted these "Pippa" earrings.  I'm not usually a "buy to match" kind of person, but in this case it was really nice to have something that matched the colors of both the stone and the metal in the pendant.  Even so, the shapes are different, resulting in a pairing that is coordinated without looking like a "set".

I'm off to get my Vitamin D, in the sunshine, and eat my veggies.

Until next time.