Showing posts with label tools. Show all posts

Monday, October 7, 2024

10.07.2024 Let's Do the Twist

Twisting steel with help from Russ
I can't believe we are already at the halfway point for the fall semester at ACC. I'm taking stone setting, and for the first time in almost a decade of jewelry classes, I'm not actually making finished pieces*.

Yep, you read that right.  This class is all about learning new techniques -  it is one of the most challenging courses I've ever taken (jewelry or otherwise) - and I couldn't be happier about it.

We are making things - just not the kinds of pieces I've made in the past.  For starters, we're working with different materials.  First up - steel.

We began the semester by making a setting tool to burnish flush set stones.  Each of us were given a piece of quarter inch (square) steel, six inches long, that we twisted and then ground to points on each end.

My finished setting tool

With the help of instructors and classmates, we placed the steel in a vice, heated it until it was red hot, then twisted it to make a pattern.  More important that making the tool pretty, it creates groves that make it easier to grip when trying to move metal around a flush set stone.

After the twisting, we used a belt sander to grind down the both ends - one to a sharp point, one to a more rounded point - and then finished on the deburring wheel.  We each ended up with a fabulous tool - and while it may not be jewelry, I think it's very pretty.


Flush set CZs in brass
The purpose of this lovely little rod is to be able to push down metal around a stone to hold it in place in a flush setting.  We did our practice settings in brass, so we need a tool that was hard enough to move another metal.

After doing the flush settings in brass, we moved on to bronze - because it has a hardness close to gold (and at over $2,600 per ounce...well, we aren't going to work in that).

Four prong settings - CZs in bronze


When I first started metalsmithing - in 2015 - I imagined it would be fun...but I had absolutely no idea how essential it would become to maintaining my mental and physical health.

Initially, it filled an empty space in my life - after decades of being a full time mom.  

Then, it became a place where I could be creative, and I found a community.  


During Covid I realized how much I missed both the creative work and the people. Now that I am back at the bench - especially as a student - I realize how much happier I am when I'm making and learning in a shared space.

As for my physical health...at 61 I have outlived my Mom.  My Dad lived into his 70s, but by his early 60s he was already beginning to show the signs of Parkinson's Disease that would slow him down until, at the end of his life, he really wasn't doing much living.

Parkinson's is hereditary - there's no diagnostic test, and there's no cure - but there are ways to potentially delay its onset including keeping both your brain and body active.  Taking jewelry classes is a big part of that.  In addition to my regular yoga practice and walking, jewelry class makes me use my hands and maintain my fine motor skills, and it absolutely helps me build new neural pathways.

So, I might not be making more shiny things in this class - but I am definitely working on being around and healthy to wear all the things I have.

Until next time.

GOLD! Watch for some new things.
*De, our instructor, did tell us it would be a good idea to have a personal project or two, because we will get frustrated and need to turn our attention to something else occassionally...so despite the price, I've purchased some gold so that I can take advantage of both the bench time and her knowledge.  Stay tuned!


Monday, August 31, 2020

08.31.20 The Older, the Better

My Mom (L), Dad (R) and my Grandmother - 1957
My parents would have been married 62 this month
Last time, I wrote about all the new stuff in my kitchen...this time, I want to write about some things that are very old, very special and only get better with age: my maternal Grandmother's cast iron skillets. (I also have her wedding ring, which I've written about before...you can go back and read that story here.)

She had three - a 7", an 8" and a 10" - I have them all. 

My grandparents were married in 1935, so I imagine (because I don't know for sure) that she acquired these skillets around that time...which makes them about 85 years old. I treasure them, because they represent some of my earliest, and fondest memories of time spent with my grandmother in her kitchen.


My grandmother learned to cook, both from her own mother, and from the woman who cooked and kept house for her family when she was growing up in Alabama.

She made wonderful chicken soup and matzo balls, but she also made incredible fried chicken.

She used her cast iron every day - she cooked my grandfather's breakfast, toast, coffee and  - three eggs, sunny side up in one of her skillets...but my favorite use for them was baking cornbread.  

She would make it often, and if there were leftovers from the day before, she would dip it into buttermilk as a bedtime snack.  

I wanted mine warm, with lots of butter...and there weren't many leftovers when we were visiting.

When my brother and I were young, we would regularly spend the night with my grandparents. I didn't appreciate then (as I did later when I had my own children), that it wasn't just a treat for us...it was a huge break for my parents.

I loved staying with my grandparents, and I especially enjoyed cooking with my grandmother.  I always asked if we could make cornbread to have with breakfast.  She always said yes.

We would measure and sift the dry ingredients the night before, then add the egg, buttermilk and melted butter in the morning.  I have the recipe written on a card in her handwriting, and I still bake it in her  skillet.

The cornbread is in regular rotation as part of my pandemic menus, usually served alongside quick tenderloin beer stew from Jacques Pepin's Fast Food My Way cookbook.  I've shared both recipies at the end of this post.

I'm using the skillets for a lot of other meals, too...

One of our favorite local restaurants, Dai Due, makes the only fried chicken I've ever had that's as good as my grandmother's.  They only serve it on Sunday, and we get an order of it every week.  They've also started selling their hamburger patties and wonderful sausages to cook at home.


There's really nothing like a good burger, and honestly - they don't travel well - so it's been wonderful to be able to get them ground that day, along with fabulous brioche buns...and cook them at home.

Another great recipe - for lamb chops (which I am buying at the farmers market) - came from one of my jeweler friends. You sear the marinated chops on top of the stove, then finish them in the oven.

Not only are these well worn, deeply seasoned pans fabulous for cooking...they bring back wonderful memories of my Grandmother everytime I use them.

The world is a pretty dark place right now, and I'm working to find hope and light where I can...pulling out these skillets, that fed my family for generations before me, and cooking with them regularly brings me joy.  That probably wouldn't have happened if we hadn't been forced to change what and where we eat - among other things.

Until next time.

Jacques Pepin's Instant Tenderloin Beef Stew
From “Fast Food My Way”

2 tablespoons unsalted butter, divided use
1 tablespoon good olive oil
1 1/2 cups diced (1/2-inch) potato, rinsed under cold running water
1 cup baby carrots (about 4 ounces)
1 cup small white button mushrooms
1/3 cup chopped onion
1 tablespoon chopped garlic
1/2 cup baby peas, fresh or frozen
1/2 teaspoon salt, divided use
1/4 teaspoon freshly ground black pepper
1 pound beef tenderloin (filet mignon), trimmed of all fat and cut into 1 1/2-inch pieces
2 tablespoons dry white wine
2 tablespoons homemade chicken stock or low-sodium canned chicken broth

Heat 1 tablespoon of the butter and the olive oil in a large skillet over medium-high heat. Add the potatoes, carrots and mushrooms. Cook, partially covered, stirring occasionally, for about 8 minutes, or until the vegetables are cooked through and lightly browned.

Add the onion and cook for 1 to 2 minutes longer.

Add the garlic, peas, and 1/4 teaspoon of the salt and cook for 1 minute. Set aside, covered, while you cook the steak.

Heat the remaining 1 tablespoon butter in another skillet over medium-high heat until it is very hot but not smoking. Sprinkle the remaining 1/4 teaspoon of salt and the pepper on the filet pieces and add the meat to the skillet in one layer. Saute, turning, for 2 to 3 minutes, until the meat is browned on all sides. Transfer to a platter.

Add the wine and stock to the skillet and boil for about 10 seconds.  Pour over the meat and vegetables, and serve.

Gertrude's White Meal Cornbread

Preheat the oven to 475 degrees.

Place 2 tablespoons of butter in a cast iron skillet and put the skillet in the oven while it heats. Remove when the butter is melted.

Sift together dry ingredients:
1.5 cups white corn meal
3 tablespoons flour
1 teaspoon salt
1 teaspoon baking soda

Add to the dry mixture and whisk until there are no lumps
1 egg, slightly beaten
2 cups buttermilk

Remove the skillet from the oven, pour the melted butter into the batter and whisk in.

Pour the batter into the hot skillet, return to the oven and bake 20-25 minutes until a toothpick or knife comes out clean.

Allow the bread to cool briefly - 5 or 10 minutes - before cutting.

P.S.

Last week I put up a couple of posts on Instagram and Facebook about tea towels...and that I often pick them up as souvenirs...well, turns out my grandmother did that, too.

My mother's first cousin (who was really more like a sister, as they were both only children) responded to my post, writing:

This is so amazing because both my mother & your grandmother always sent tea towels as gifts & souvenirs of their travels!! 

It's not just jewelry that tells stories...cast iron and tea towels do, too.

A few of my souvenirs, clockwise from the top:
Berkeley, Napa, Madison, Boston and Hawaii

Monday, November 12, 2018

11.12.18 It's about more than cookies

Being a Girl Scout has been part of my life for almost 50 years.

Fun fact: more than half of the women elected to the 116th Congress were Girl Scouts.

For me, it started as a Brownie, in elementary school (that's me in the third row, in my uniform). I was a troop leader and a cookie mom for years while my daughter was involved in scouting.


I was really delighted when earlier this year, not one, but two local troops asked me to come spend an afternoon and help them earn their jewelry badges.


I took my roll of hand tools, my saw, and some pendants - both finished and unfinished - and spent part of an afternoon talking to them about the art and skill involved in metalsmithing.


They were good listeners, asked great questions and reminded me how eager young people are to learn - especially when you make the teaching relevant.

We talked about the history of jewelry, and that many metal techniques have been around for thousands of years...some of them have changed very little (lost wax casting, for example) and others have been modernized and automated (the use of CAD and 3D printing in design).

I spent some time on stones, too. I explained the difference between precious and semi precious designations; geography and the impacts of mining; that I don't cut my own stones, but rely on lapidary artists for the beautiful cabochons I use.

Not only was it fun, and a little nostalgic, to hang out with these girls and their moms - but it made me think about how important it is to remind our kids (and ourselves) that there is value in creating things that make us happy.

I hope this post will inspire you to do something you enjoy - and find time to you share it with a young person in your life.

Until next time.


Monday, May 28, 2018

05.28.18 When my baby smiles at me, I go to Rio...

Photo credit: NBC/SNL
actually, it's probably me who is smiling, because the Rio I am referring to is Rio Grande Jewelry Supply...and if I'm on their website, it means I'm buying more supplies!

Remember how Stefon (City Correspondent for SNL) said "this place has EVERYTHING"...


Well, they really do - and these days my average order with them is several hundred dollars of silver wire, sheet, chain - pretty much everything I need to make my pendants and earrings.  Not just metal - they are a one stop for all things jewelry.

I got so excited the last time a box arrived, I posted it as an Instagram story - and the Rio shared it!!


I also love their customer service...

my favorite pair of pliers has replaceable nylon jaws.  I use them all the time, and I love them because they don't leave marks on the metal.  After a while, the jaws got thin, and the screws were starting to poke through, so I ordered a replacements.  When the new nylon pieces arrived, I took the screws out of the old ones and tried to put the new ones in place...except...they were the wrong size.


I thought perhaps I had ordered incorrectly - so I called Rio, and after a bit of back and forth it turned out that while the part number had stayed the same, the pliers (and the replacement jaws) were actually different from the ones I had ordered a year before.


For some companies, that probably would have been the end of it - but instead - one of their parts managers said he would investigate and in the mean time, sent me a new pair of pliers, no charge.

Their folks are great in person, too. I had the opportunity to meet a few of them when they came to Austin to visit Creative Side to talk with the staff and members (like me) about our journey as makers.

When you watch the video, you will see why I love being in the studio with these amazing, creative people.  If you look carefully, you will also see the frog pendant in progress!
We live in tumultuous, stressful times, but thanks to Rio, I can keep calm and solder on.

Until next time.


Monday, September 12, 2016

09.12.16 Hi ho, hi ho...

it's off to work I go...in the studio, that is.

Yep, as of September 1, I am a full time member/renter at Creative Side Jewelry, with my own key!  Back in February I put my first piece up in my Etsy store - and since then I've sold about a piece a month - which is very exciting.

I've also made some decisions - big and small - that brought me here.

The big decision was committing to more time at the bench.   I've done a lot of talking with my husband - who has been my biggest supporter and encouraged me throughout this journey.  In fact he's the one who suggested I not wait until the start of 2017 to rent a bench, but to go ahead and do it now, so that I can create some inventory in advance of the holidays.

Smaller decisions involved buying a few special tools of my own, even though the studios at Creative Side are fully equipped.  

Photo credit: amazon.com
Joyce Chen scissors.  These things are amazing - they cut through sheet metal (I've used them on 20 gauge silver with no difficulty) and allow you to get really close to an edge.  I learned about using scissors rather than sawing from Ronda Coryell.  Before becoming the guru of argentium, she generally worked with gold; she NEVER saws - because sawing results in lost metal - and gold is expensive.  I don't saw nearly as much because I've learned I don't have to. 

Photo credit: Rio Grande Jewelry Supply


For those tight spots you can't get into with scissors, I love these Lindstrom flush cutters.  They are pricey ($48 from Rio) but like the scissors above, they will cut right through sheet metal, and in the tightest of spots.  They also leave a very clean edge when cutting wire for jumprings or earring findings.

I also purchased a couple of pairs of Euro Tool specialty pliers from Rio - not as expensive as the cutters, but oh, so useful for very specific tasks.

Photo credit: Rio Grande Jewelry Supply
Sometimes before cutting a length of wire, I really want to make it nice and straight - and flat nose pliers with nylon jaws are a dream.  You can pull the wire through (over and over if you want) without kinking or scratching.  They are also great if you need to bend or straighten a piece of sheet - because they won't mar the surface there, either.

While the flat nosed pliers are more general purpose, the other pair I bought is not - but it is ideal from someone who bends a lot of bails and earwires.

Photo credit: Rio Grande Jewelry Supply


These bail shaping pliers have six different graduated sizes for making loops around - and I find them much easier to use - especially for bails (when I am forming them from 20 or 22 gauge sheet) than traditional round nosed pliers.

Photo Credit: Otto Frei


Finally, I bought a Green Lion saw. I'd been using the standard saw frames at the studio - and doing just fine - but I had heard about this saw.  I asked a lot of questions in an online metalsmithing group - and to a person - the answer I got was "if you really want to do advanced piercing work (cut outs on the back of my pendants) - invest in this saw."  So, I did - and I haven't been disappointed.


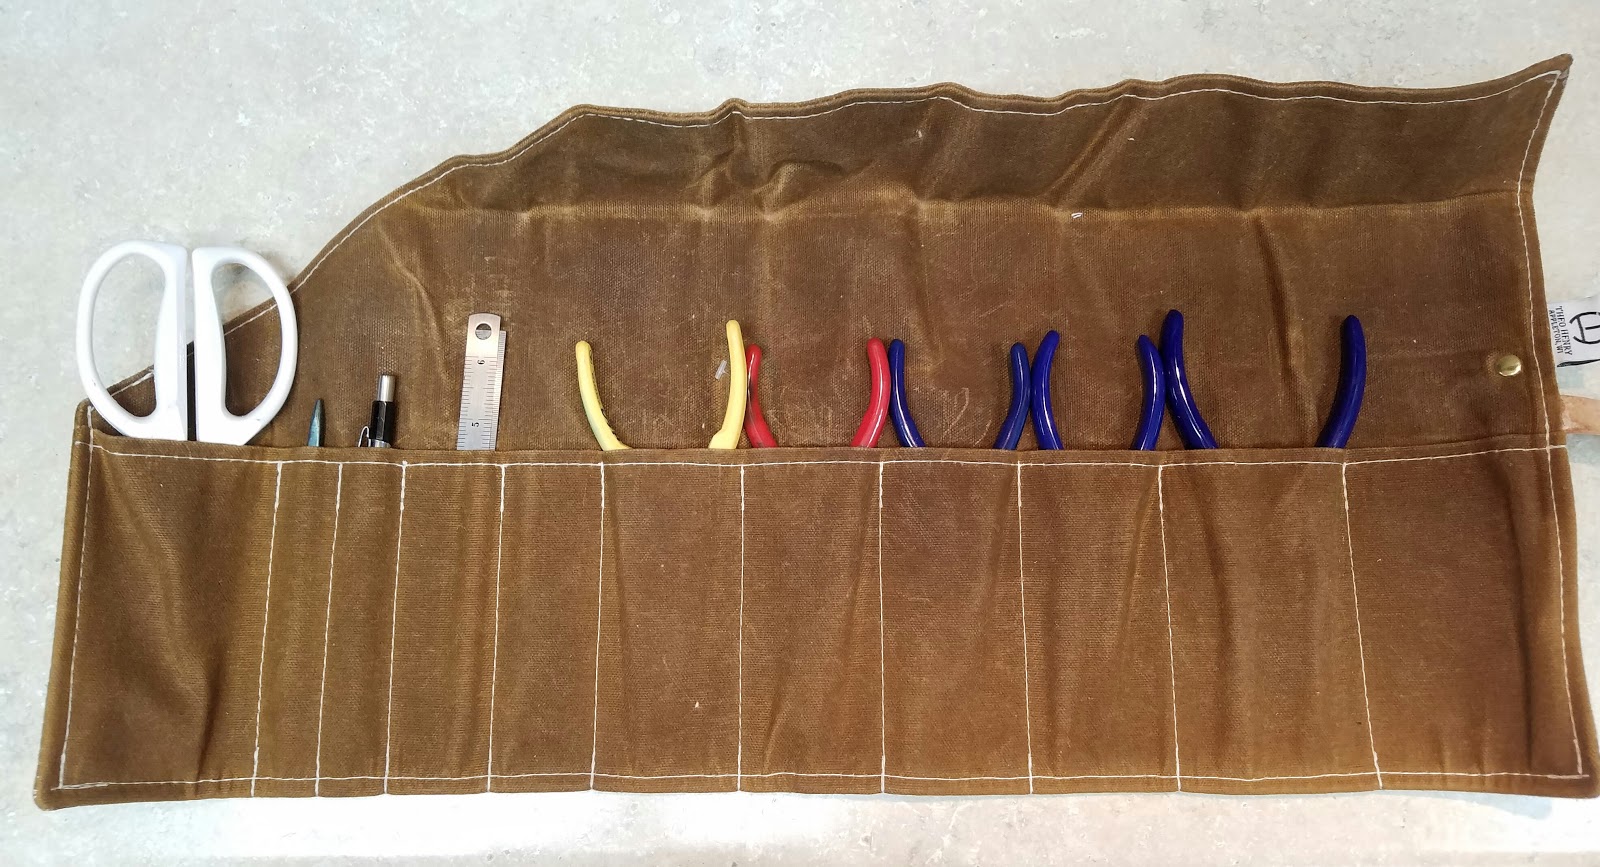
To tote all these things - plus a few others like pencils, rulers and some less exotic pliers - back and forth to the studio, I bought a wonderful waxed canvas and leather tool roll on Etsy (supporting other independent craftspeople is really important).

Photo credit: TheoHenry on Etsy


I'm really excited about this next step - and look forward to continuing to share what I learn and make with all of you.

Until next time.