Monday, August 29, 2016

08.29.16 Corning Glass - it's not just Pyrex

Roman glass 
Like metalsmithing and jewelry making, glass making is an ancient industrial art, dating back to 2000 B.C. in Mesopotamia (also known as the "fertile crescent").

To that end, visiting the Corning Museum of Glass has been on my bucket list for some time.  Well - check that one off - because I was there in late August and despite spending a full day in the galleries and demonstrations, it wasn't enough...I'm going to go back!

I spent several hours in the 35 Centuries of Glass galleries - and could have spent days.  The cases were filled with simple, every day pieces, extravagant decorative pieces, and of special interest to me, glass jewelry.

There were cases full of European glass beads from the 16th - 18th centuries.  The beads were used as ballast in ships, then traded in African countries for other commodities
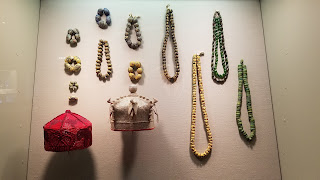
European trading beads


Jewel toned glass and millefiori beads


As glass making progressed beads took on the bright colors of precious stones, and the Italians developed the millefiori process - creating designs using tiny rods of glass fused together to make patterns.


Mosaic glass


Other examples of jewelry included necklaces and earrings made from glass mosaics.

I tried my hand at fusing glass by signing up  for one of the museum's "glass experiences". Working with one of the museum's resident glass-makers I made a souvenir piece of my own - a lamp work pendant.

Working regularly with a torch as a metalsmith gave me an advantage at the glass bench - as I was already comfortable with the idea of manipulating material in a flame.


The staff gave me an apron, dark glasses (which makes it easier to see the glass in the flame) and "sleeves" to put on my forearms.

After a short demonstration how to form the base of the pendant, and add layers of color, I sat down and got started.  The whole process took about 30 minutes - and it was exciting to see the layers of glass come together and swirl into a ball.  Then the glass was pressed flat to form the pendant.


The glass has to cool slowly - over about 24 hours - before it is truly finished.  Because we were only spending one day in Corning, I took advantage of the museum's shipping program - and my finished pendant arrived in Austin a few days after I got home.

I loved having the opportunity to learn something new - and to be create a wonderful souvenir in the process.

Until next time.


Monday, August 22, 2016

08.22.16 Iconic

I am really excited about my "Love Note" pendant series - and have just begun to list finished pieces for sale in my Etsy shop.

As I've said before - the inspiration for the original heart pendant was my sister in law, who is a librarian...so I went searching on the internet for a book template that I could use to cut out the back of hers.  It wasn't the first "story" I put on the back, though - that was the "Chem Lab" - the Erlenmeyer flask inspired by my daughter.

However, since I decided to start the Love Notes line - with varying icons on the back of the pieces (I expect I will repeat some of them) - I've found that I am looking at the world a little differently.  I  am constantly seeing shapes that I never really noticed before, and realizing they would be ideal icons for the backs of my pendants.


As I was sitting at the kitchen table a few weeks ago with my stones spread out in front of me,  I looked up and saw my cat sitting at the backdoor, asking to go out.  In that moment, it struck me that the pattern blue lace agate looked like tabby cat fur - and suddenly - I knew exactly what to put on the back of piece!


I started by cutting a cat silhouette out of a some card stock to see what it would look like - and I was right - it captured our fat tabby to a T!

I'm tickled with how the Fat Cat pendant turned out - although I think MoJo could care less, as long as I continue to make sure his bowls are full and he can come and go as he pleases.

Sawing through silver sheet - piercing is the metalsmithing term - is one of the first skills we worked on in my Fabrication 101 class.  It takes practice - and I wouldn't have wanted to attempt anything too detailed or complex at the beginning - but I have become quite comfortable with the saw, and love to see the story on the back of the pendant taking shape.


The cat, and one I've called "Rhapsody in Blue" - were the first two pendants I made with the intention of putting them up for sale.  I'm delighted to report that Rhapsody has already sold - and I had the loveliest note from the buyer.  So, stay tuned for more Love Notes and stories.

I won't be making just hearts - or even just pendants - but at least for a while, I think they will figure prominently in my bench work

Until next time.

Wednesday, August 10, 2016

08.15.16...and now, for something completely different.

Every time I work in a different medium, not only do I learn learn something new, but I also develop a deeper understanding of all aspects of jewelry fabrication.  Like metal, wax comes in wire and sheet forms (in addition to block forms for carving - which was what I did in my very first class).

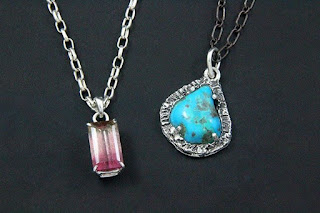
On the second day of the wax for stone setting class, I took a completely different approach - and used a stone at the opposite end of the spectrum from the tourmaline - a free form turquoise nugget.

After a couple of failed attempts to create a basket with wire, Steve suggested building a setting with wax sheet as the base, and using a heavier wire to create a bezel and prongs to fit the stone's uneven shape.


That's exactly what I did, and it worked really well.  Then I used the wax pen to create texture in the bezel, as well as securing it to the wax sheet by melting them together.

I also took some smaller pieces of sheet and wire and formed a couple of bails.  I wasn't sure quite what I wanted in terms of a bail for this piece, and as it turned out, I didn't get one of them quite right - but again I learned something in the process.


With all my wax work done, it was time to sprue the pieces and put them in a flask for casting.  Spruing is the process of connecting each piece to a wax stem (the sprue) that will create a pathway for the molten metal to flow into the void in the casting flask that is left when the wax burns away. This is why the process is called lost wax - when the flask is fired in a kiln, the wax is lost, and a one-time mold is left for the metal.


The flasks containing the wax and investment (plaster of paris material that creates the mold) were fired overnight on Saturday, and the metal casting was done Sunday morning.  I arrived at the studio to find that my wax had all cast successfully, and set about cutting the excess silver away and finishing each piece.


I said earlier that I had made a mistake with one of the bails - and you can see it here - the larger bail should have been cast with the ends open, and probably with a small pin on one side - so that it could be put through the jump ring on the pendant. 

I tried sawing it open and soldering a pin in place, but that didn't work very well - so I chalked that up to a good learning experience, and used the smaller bail (which also had to be sawed open) on the turquoise pendant.

To clean up and prepare the settings for the stones, we used both hand and power tools, with increasingly finer grades of grit, to create a bright, clean finish on the silver.

As with fabrication, setting the stone is the very last step - and needs to be done with care and patience.  Steve worked his way around the room to every bench, helping each of us to ensure that all our hard work was not lost to a slip of the hand or a tool.

Once again - I left Creative Side with knowledge spilling out of my ears, and two beautiful pendants to add to my growing collection.

Until next time.

Monday, August 8, 2016

08.08.16 Ain't nothin' sweeter...

Summer - Alice Gordon and Vincent Virga
...than a watermelon dream
'Cept sittin on the front porch eatin' that peach ice cream
When life is really sweeter than it seems
That's what you've got to call a watermelon dream.


- Guy Clark

Nothing, and I mean nothing, says "summer" to me like watermelon.  I bought this book - a collection of essays and illustrations about the season - more than 25 years ago based solely on the cover (it's actually a wonderful book).


Like its namesake fruit, the colors of the watermelon tourmaline make me think of long, warm, lazy days.  So, it's not surprising that when I saw this magnificent 8.5 carat emerald cut beauty in Yvonne Raley's Etsy store, I wanted it!

I didn't buy it right away - in fact - I hemmed and hawed about it for a very long time.  Fortunately, no one else wanted it more than me - and when she had a gemstone sale (and I knew I was getting ready to take a class on casting for stone setting) - I bought it!

It is far and away the most expensive piece I've purchased to work with myself - but it turned out to be the perfect choice for Steve Kriechbaum's wax wire class.

As is the Creative Side way, everything was set up and ready for us on our benches when we arrived on Friday morning for the start of the three day class.


Our instructor, master goldsmith Steve Kriechbaum began by demonstrating how to use wax wire (which is just what it sounds like, wax that is thin and narrow and comes in gauges that correspond to metal wire).  To make a ring or pendant, you begin by constructing a basket to fit the underside of the stone, then add embellishments and prongs before preparing the wax for casting.

Steve worked quickly - and made it look easy - but for me it was a real challenge.  While the approach to assembling the piece is somewhat analogous to fabrication - working with wax is nothing like working with metal.  The wax is soft, and delicate - and far less forgiving than metal wire - so my pendant came together pretty slowly.


I began by creating two rectangles - the same size - to create the basket to hold the stone.  Then I "welded" the pieces together using a wax pen (a pen sized wand with a heating element on the end to melt the wax).


It took all day to get the setting assembled - far longer than working in metal would have taken me; but when I was done, it really was beginning to look like a pendant...and I had learned a lot on our first day.

This was just the beginning, so stay tuned.

Until next time.


Monday, August 1, 2016

08.01.16 Who knew...

when I decided to take a hiatus in July that it would be such a tough month for the world.

Fortunately, I was able to continue spending time in the jewelry studio - because it has become a place of peace and solace for me when current events become too much to bear.

In addition to the wax wire class I took at the end of June (posts on that starting next week), I've had time to work on more pieces to sell!

I ordered "jeweler" business cards (not to be confused with "blogger" business cards) and set up a Facebook page for my jewelry.


The banner photo shows the earrings I made in Ronda Coryell's class and almost immediately I had a request for a pair of the slumped leaf earrings.  Those were a big hit, as soon as I posted pictures, folks were asking for more.


I also had a half dozen dyed turquoise (I received them as a "bonus" with another order) - and some scalloped bezel wire that was really too narrow for all the cabochons I plan to use for pendants - and inspiration struck!  More earrings!


I made three pairs, posted them on Facebook and Instagram - and they were gone in a couple of days! (I thought I was pretty clever, too, punching holes in my cards for the earrings).


I've also started a series of pendants called Love Notes.   I received such a positive response to the heart pendant I made for my sister in law, that I am going to do more! 

In fact, my first one is complete -  a commission called "Hearts and Rainbows" made with a beautiful boulder opal.  It's for my friend who told me about the Aboriginal fable surrounding opals  - that they are rainbows sent to the earth as a message of peace and captured in the ground.
This week I'm doing a "trial run" on becoming a full time renter at Creative Side.  My original goal had been to start in January, but because the jewelry is selling, I'm pulling that timeline in.  I have a couple more Love Notes that I'm just about to finish and post in my Etsy shop, and another commission!

I'm excited about pushing myself to do new work and put it out in the world.  Watch this space for more hearts and stories soon.


Until next time.